An error page appears when a webpage link is not available to visit because of server unavailability, the link or event expires or simply encountering a non-existing webpage. In this article, we will learn how to set a 404 error page in WordPress.

This blog explores and shows solutions for landing on error pages to redirect audiences. After redirection, they encounter error pages in your WordPress setting to a page dedicated to this problem. Let us begin with some information about the 404 error.
What Are 404 Errors Page?
404 error pages are like a signpost on the internet highway that tells you when you have taken a wrong turn. When you click on a link or type a web address incorrectly, instead of finding the page you wanted, you end up on a 404 error page. It is like arriving at a dead-end street in a city where you can not go any further.
When Does a 404 Error Happen?
There could be a few reasons a 404 error happens when a web page you are trying to reach has been deleted or moved to a different location. This is simply known as Link Rot. Sometimes, you might have mistyped the URL, or the link you clicked on could be broken.
What Are the effects of landing on a 404 Error Page?
Imagine you are exploring a new city, and every time you take a wrong turn, instead of finding helpful signs, you are greeted by a dead end with no directions. Frustrating, right? That is how visitors feel when they encounter a generic 404 error page on a website.
A generic 404 error page is like a blank wall and it does not give you any clues about where to go next. Visitors might feel confused, lost, or even annoyed. They might give up and leave your website altogether, which is something you do not want.
But it does not have to be that way. You can turn a dead end into a redirection route with a custom 404 error page. You can guide them back on track instead of leaving visitors stranded. That is why it is essential to have a custom 404 error page that not only informs visitors about the error but also provides helpful links or a search bar to help them.
Benefits of a 404 Error Page in WordPress
A custom 404 error page in WordPress offers several advantages. It can enhance the overall experience for your website visitors and benefit your site in various ways. Have a look below and see the benefits of a 404 error page.
Improved User Experience:
- A custom 404 error page improves the user experience by guiding visitors back to relevant content, enhancing user experience.
- It prevents frustration by providing alternative navigation options.
- A custom 404 error page helps visitors find what they’re looking for instead of hitting a dead end.
Increased Visitor Retention:
- A well-designed custom 404 error page helps retain visitors who might otherwise leave the site after encountering a dead end.
- It provides helpful links or a search bar to encourage further exploration.
- It keeps visitors engaged and increases the likelihood of finding valuable content.
Enhanced SEO Benefits:
- A custom 404 error page contributes to better SEO by reducing bounce rates.
- Generic 404 error pages can increase bounce rates, negatively impacting search engine rankings.
- Guiding visitors to relevant content improves site structure and reduces bounce rates, positively affecting SEO efforts.
Furthermore, a custom 404 error page presents an opportunity to showcase your brand personality and engage users creatively. Instead of displaying a dull error message, you can inject some personality into your 404 page with witty copy, playful graphics, or interactive elements.
This helps humanize your brand and leaves a lasting impression on visitors, turning a potential setback into a memorable experience. You can strengthen your brand identity and build a stronger connection with your audience by leveraging your 404 error page as a creative canvas.
How to Set a 404 Error Page in WordPress
In this blog, we have discussed two easy methods on how to set a 404 error page in WordPress, each offering its benefits and considerations. Let us take a brief look at both methods and understand the importance of choosing the one that best suits your website’s needs and preferences.
Method 1: Set 404 Error Page Using Site Editor
Setting up a custom 404 error page using the built-in Site Editor feature in WordPress with Twenty Twenty-Four theme is a straightforward process. It allows you to tailor the page to fit your website’s design and tone. Follow these simple steps to create a custom 404 error page and enhance your visitors’ experience.
Step 1: Access the Site Editor & Choose 404 Error Page Template
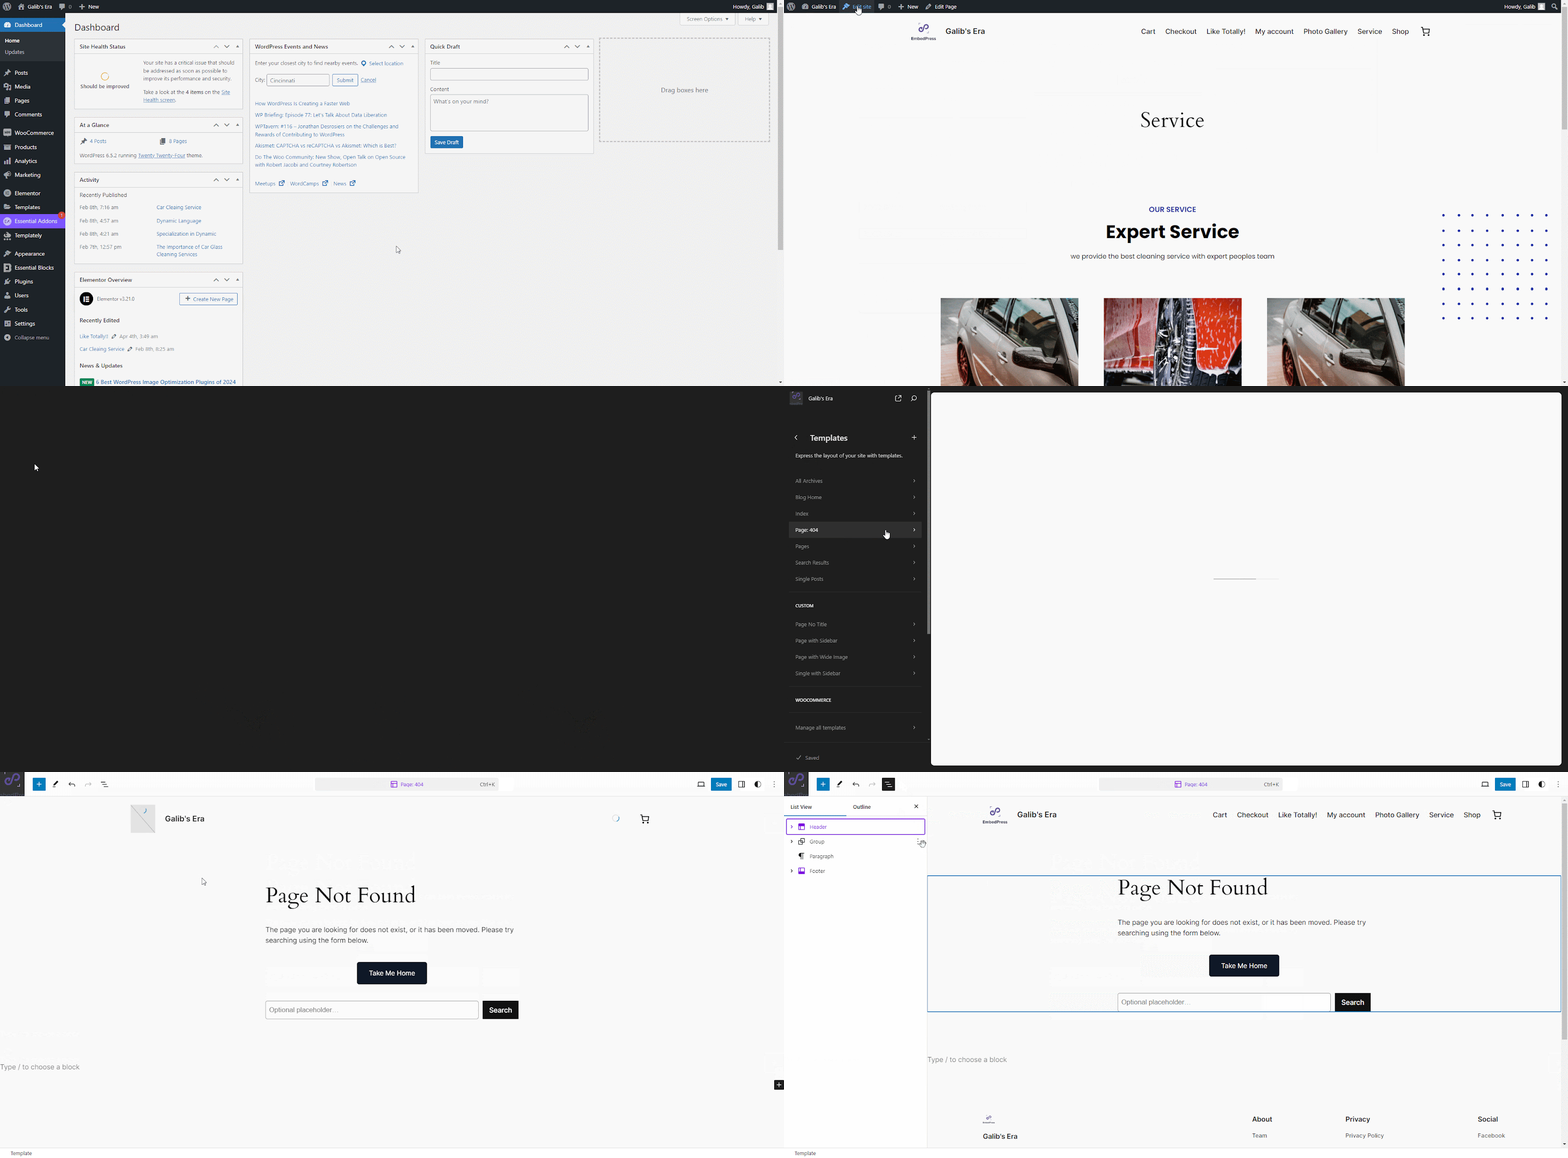
Log in to your WordPress dashboard and navigate to any page. From there, select the ‘Edit Site’ option. This will open the Site Editor interface, where you can make changes to your site’s design and content.

In the Site Editor, locate the option to edit your site’s pages. Click on ‘Page: 404’ to edit the template, which is specifically designed to handle 404 errors. Click on this template to begin customizing your 404 error page.
Step 2: Customize the Content And Add Elements
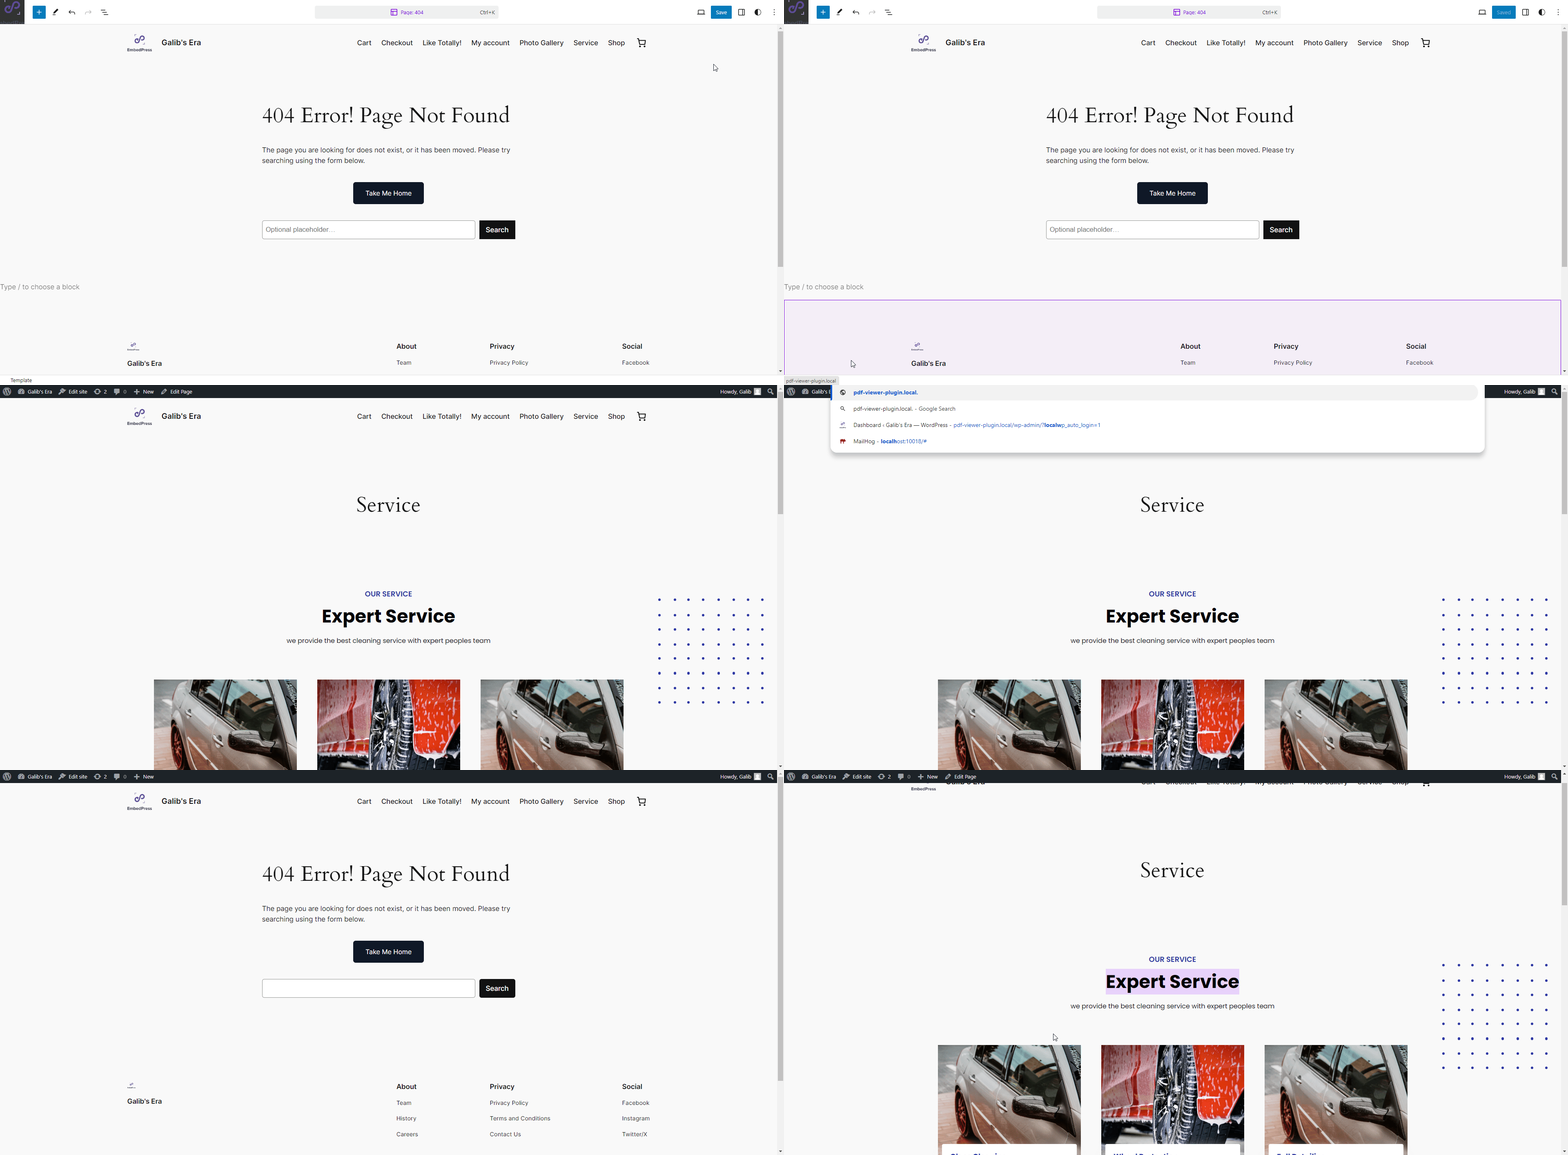
Once you have selected the 404 error page template, you can start customizing the content. Add a catchy headline and a brief message explaining that the requested page could not be found. You can also include helpful page links or a search bar to assist users in finding relevant content.

To make your custom 404 error page more visually appealing, consider adding images, graphics, or icons that align with your website’s branding.
Step 3: Preview And Publish
Once you have finished customizing your 404 error page, if everything looks good, click on the ‘Save’ button to make your custom 404 error page live on your website.

Select ‘view site’ to preview how it will look to visitors. Use the preview option in the Site Editor to see how the page appears on both desktop and mobile devices.
To ensure that your site editor’s custom 404 error page effectively engages visitors, consider implementing some additional tips. Have a look below.
- Keep the tone friendly and helpful to reassure visitors that they’re not alone.
- Include a prominent call-to-action (CTA) that encourages users to explore other parts of your site or contact you for assistance.
- Test different layouts and elements to see what resonates best with your audience.
- Monitor user interactions and make adjustments based on feedback and analytics data.
By following these steps and optimizing your custom 404 error page for better user engagement, you can turn a potentially frustrating experience into an opportunity to connect with your visitors and keep them engaged on your website.
Method 2: Set 404 Error Page in Elementor Page Builder
Now, let us learn about the second method of setting a custom 404 error page using the powerful Elementor Page Builder. You have the flexibility to create highly customized and visually appealing 404 error pages that align perfectly with your website’s design and branding with Elementor.
Step-by-Step Instructions:
Before setting up a 404 error page with Elementor you need to have the Elementor PRO plugin installed. Then, follow these steps to set a 404 error Page.
Step 1: Access Elementor Theme Builder
Begin by navigating to the Elementor Theme Builder plugin from your WordPress dashboard ‘Template’ section.

Step 2: Create New Page
Inside the Elementor theme builder, create a new page by clicking on ‘+ Add New’ in the upper left corner, then a page will be created and automatically take you to that page a template library of 404 error page templates will appear.

Step 3: Choose Elementor Template
After creating the new page, select one template that you like or think would be the best fit for your site’s 404 error page. Click on ‘Insert’ and then ‘Apply’ to import the template to your 404 error page just created.

Step 4: Customize Layout And Publish
Experiment with different layout options, colors, fonts, and other styling elements to create a visually appealing design that matches your website’s aesthetic.

Ensure that your custom 404 error page includes links such as the homepage, popular articles, or relevant categories. This will help guide users back to valuable content and reduce bounce rates. Preview to see if it works properly and click the ‘Publish’ button to make it live.
Flexibility And Customization Options
One of the key advantages of using Elementor for creating a custom 404 error page is its unparalleled flexibility and customization options. Unlike traditional methods, Elementor allows you to design every aspect of your page with precision, giving you full control over its appearance and functionality.
Examples of Creative 404 Pages
Elementor empowers users to unleash their creativity and design unique 404 error pages that captivate visitors and reinforce brand identity. From playful illustrations to interactive elements, there are countless examples of creative 404 pages crafted with Elementor that effectively engage users and mitigate the frustration of encountering an error.

Tips for Seamless Integration
To ensure that your custom 404 error page seamlessly integrates with the rest of your website’s design, consider the following tips.
- Maintain Consistent Branding: Use consistent colors, fonts, and imagery to reinforce your brand identity across all pages of your website, including the 404 error page.
- Test for Responsiveness: Ensure that your custom 404 page displays correctly on all devices, including desktops, tablets, and smartphones, by testing its responsiveness.
- Monitor Performance: Regularly monitor the performance of your custom 404 error page using analytics tools to track user engagement and identify areas for improvement.
In conclusion, having a custom 404 error page for your WordPress website is crucial for enhancing user experience and maintaining a professional online presence. By providing visitors with helpful guidance and relevant links when they encounter a dead end, you can significantly improve their journey on your site and increase the likelihood of retaining them as engaged users.
Redirect Your lost Visitors to Your Home Site
We have explored two easy methods for setting up a custom 404 error page: using the built-in Site Editor feature and leveraging the flexibility of Elementor Page Builder. Whether you prefer the simplicity of the Site Editor or the creative freedom offered by Elementor, implementing a custom 404 error page is within reach for all WordPress users.
We encourage you to take action today and set up a custom 404 error page for your website. It will improve user experience and reduce bounce rates, l also showcase your brand personality and demonstrate your commitment to providing valuable content to your audience.
If you have any questions or need further assistance with setting up your custom 404 error page, join our Facebook Community. To get and read tips and information like this blog Subscribe to our newsletter.


